Gains Network - How To Start


How to Start
Introduction
Gains Network is an innovative DeFi ecosystem of products built on the Polygon blockchain, and now available on the Arbitrum ecosystem. It offers a decentralized leveraged trading platform for crypto, forex, stocks, commodities, and indices with low fees and high leverage.
Transactions on the platform are carried out using the DAI stablecoin and can be made directly from a MetaMask wallet, either on the Arbitrum One or the Polygon Network.
This guide will show you step by step how to use the gTrade platform.
.webp)
Upgrade to premium
How to start?
To get started with opening and closing your first trade on gTrade, you will need:
- A Web 3.0 wallet; e.g., MetaMask, which is connected to gTrade
- Since you will interact with gTrade through Polygon or Arbitrum, you need either MATIC or ETH in the wallet in order to pay for transaction fees
- DAI to use as collateral
Supported Wallets
Contracts
Polygon contract for GNS token: 0xe5417af564e4bfda1c483642db72007871397896
Arbitrum contract for GNS token: 0x18c11fd286c5ec11c3b683caa813b77f5163a122
Platform Functions
Below, we will describe the most important functions of the gTrade platform.
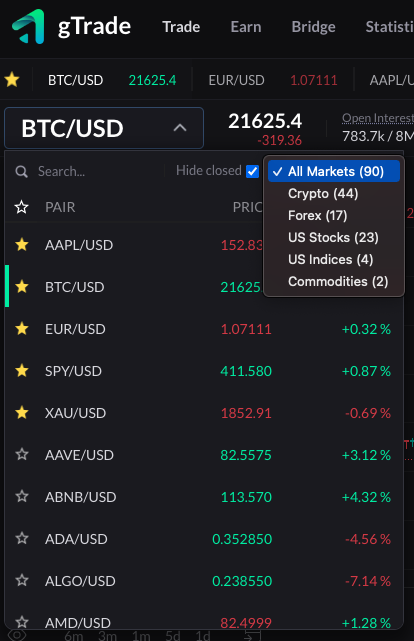
Asset Pairs
You can see all the asset pairs that you can trade in this drop-down menu. The total number of available trading pairs under the "All Markets" category is 91, at the time of writing.
Then, when you click on "All Markets," you will find the pairs separated into their respective categories, such as Crypto (45), Forex (17), US Stocks (23), US Indices (24) and Commodities (2). You can click on any category you wish to trade, and you will immediately see all the pairs available in that category.
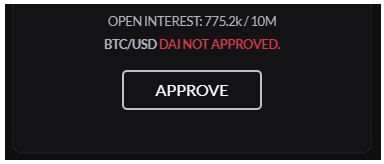
Open Interest (I)
This section refers to the sum of open long positions.
Open Interest (s)
Discloses the same information as above, but for the short positions.
Rollover & Funding Fees
Rollover and funding fees are applied to trades while they are open.
The funding fee can either add or subtract value to your position based on how many other people are trading in the same direction. If you trade in a less crowded trade, you can earn money, but if you trade with the majority, you may pay some funding fees (e.g., if most people are long - the trader will get paid for keeping a short position open, but if the trader has a long position, the long position will inquire some funding fee).
The fee changes depending on other traders opening and closing their positions. If you choose the less popular side, your liquidation price will become harder to reach, making your position more valuable, and the opposite if you choose the more popular side. Specifically, when you see a green value on the trading platform, it means you have made money, and a red value means you have lost money.
The rollover fee is a fee that is charged periodically, typically in blocks, and only applies to the collateral. This fee helps to ensure that the platform maintains low leverage, while still managing risk in an appropriate manner.
Open Trades
Here, you can see all the current open trades you have executed.
Open Orders
Here, you can see all the current pending orders that you have requested for execution but have not yet been filled.
Mumbai
If you want to test gTrade without using valuable collateral, you can use Mumbai, which is a practice mode available on the Polygon Mumbai Testnet. To use Mumbai, you need a Web 3.0 wallet, like MetaMask, connected to the Mumbai Testnet. You will also need Testnet MATIC to pay for transactions and Testnet DAI to use as collateral. Mumbai allows you to test gTrade as if you were live trading, but without risking any real money.
Long and short buttons
With the buttons ‘LONG’ and ‘SHORT’, you can execute your trades with market, limit and stop options.
Where to Put Tokens
Setting up to trade
To trade, you will need to connect to one of the networks on which gTrade is deployed; namely, Polygon or Arbitrum. In order to do this, choose one of the two networks, by clicking on the network section next to the wallet button in the top right corner.
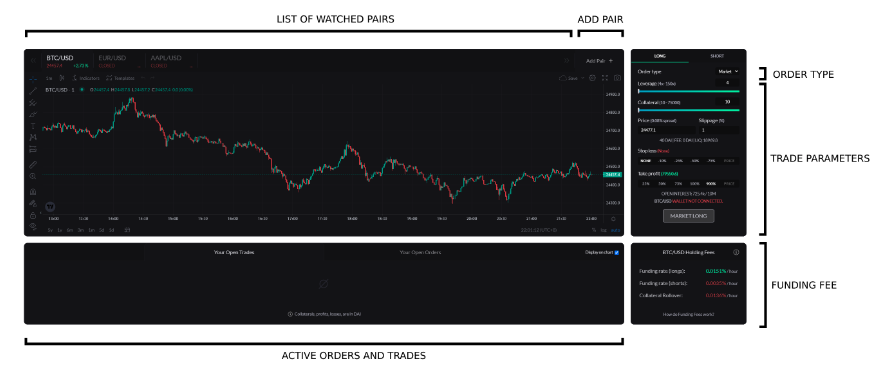
Interface Overview
These are the different areas of trading UI that this guide will be using:
- List of watched pairs
- Add pairs
- Order type
- Trade parameters
- Funding fee
- Active orders and trades
Opening a trade
First, go to the gTrade platform and click “Start Trading”. This will navigate you to the main trading page.
In the top right corner, click "Connect Wallet". If the website doesn't detect your wallet, refresh the page.
If this is your first trade, you need to approve the contract before using your DAI. To do this, click "Approve" and submit the transaction on Polygon or Arbitrum.
To select the trading pair you want to trade:
- Choose the desired pair from the available options
- If you want to save the pair for future use, select the ‘star’ next to the pair as a favorite
- The "Hide closed" option is checked by default and will hide stock and forex markets when they are closed. This setting can be changed according to your preference
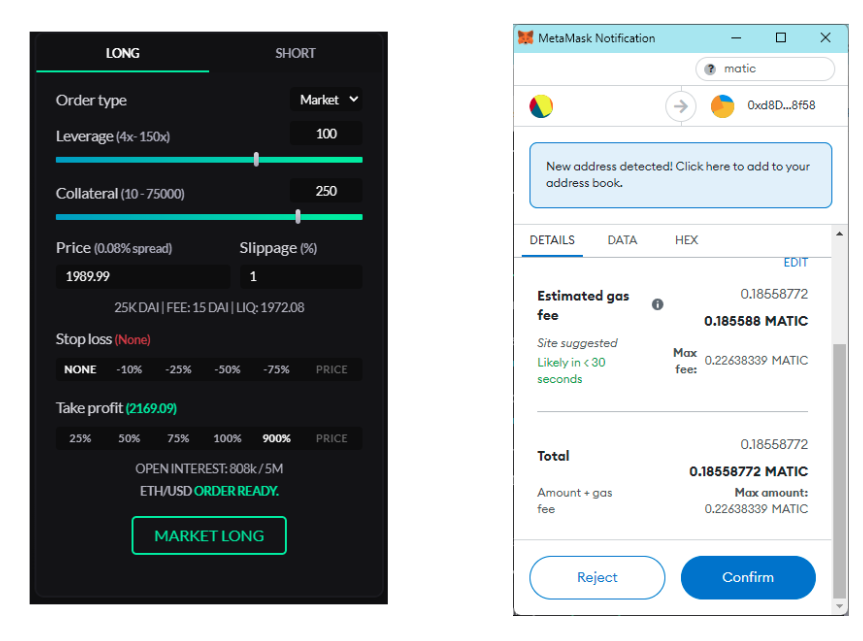
To set your trade parameters:
- Choose the trade type: LONG (buy) or SHORT (sell)
- Choose the order type: Market, Limit or Stop
Market: opens the trade immediately at the market price (+ spread)
Limit: allows you to go long at a lower price or short at a higher price than the current market price. It executes the trade at the exact price you set if the price reaches the threshold + spread.
Stop: allows you to go long if the price reaches a higher price or short if the price reaches a lower price than the current market price. The execution price will be the current market price + spread once the market price goes through a specific price you set (stop price).
- Set the ‘Collateral’, which is the maximum amount you are willing to risk in the event of liquidation. The collateral x leverage must be above the minimum position size; for example: 7,500 DAI to trade cryptocurrencies.
- Choose the ‘Leverage’, which multiplies the price volatility up and down to increase exposure
- Set the maximum ‘Slippage’, which is used to automatically cancel a market order if the price moves too quickly in the direction of the trade before it is opened
- Set the ‘Stop loss’ and ‘Take profit’. A ‘Stop loss’ is not required to be set, but the trade will be liquidated if the PnL is <= -90%. The maximum profit on a trade is 900% PnL, so if no ‘Take profit’ is set, it will be automatically set at 900% PnL.
In our example, we will set a long trade ETH / USD pair, using a market price at 100x leverage with no stop loss and a take profit of 900%. Slippage is set to 1%.
MetaMask will then appear with a gas price automatically suggested. You just need to hit ‘Confirm’ to send the transaction to the network.
To execute the order:
- Click on the order execution button, which displays the order type and direction you will be executing. In our example, "MARKET LONG". This will open the Web 3.0 popup to send the transaction to the network and open the order. A high gas fee is automatically suggested to ensure quick execution.
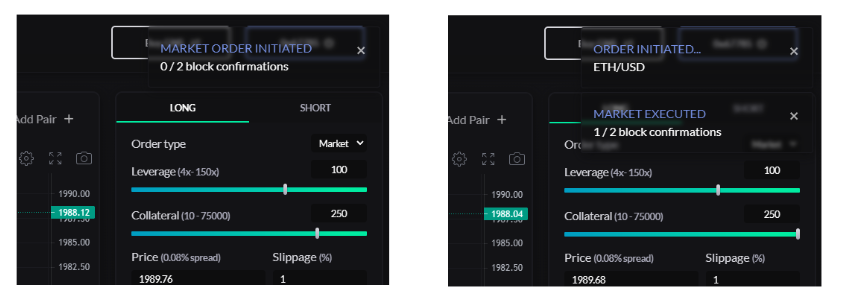
- After the transaction has been submitted, you will see the number of confirmations required before it is displayed on the front end. Once two blocks have passed, it will appear in the section "Open Trades".
- The order initiation is the moment your request to execute an order reaches the network. The order execution is the moment your trade is executed, when the current price is returned by Chainlink DON.
First, the order initiates, then it is executed.
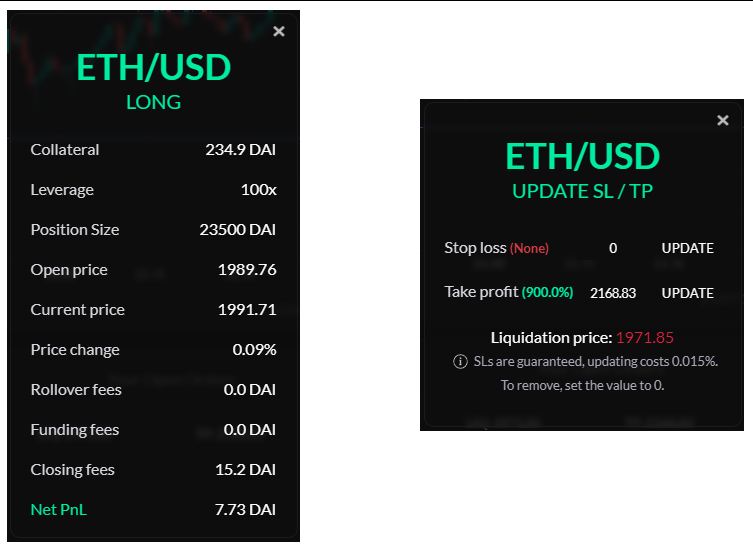
Viewing the details of an Open Trade & Updating TP/SL
With the trade now open, you can view its details by clicking on it in the "Open Trades" section. This will show the liquidation price marked in blue on the chart, and if you have set them, you will also see the TP/SL lines in green/red respectively.
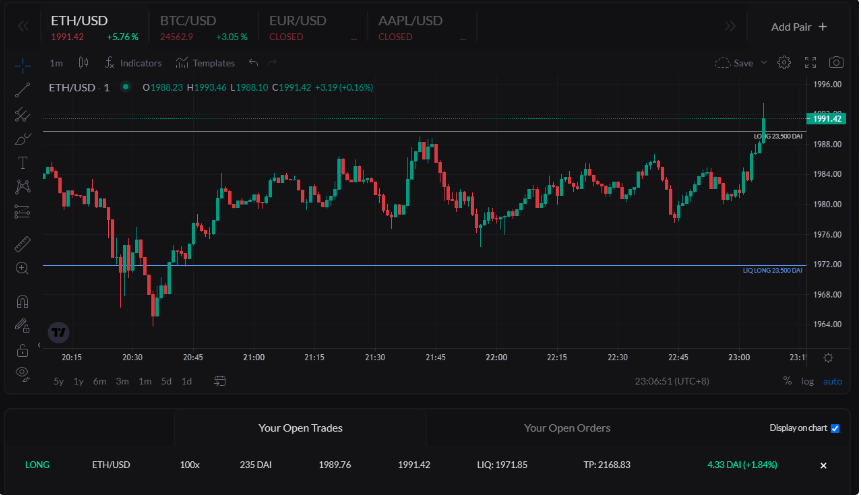
By clicking on your trade, you can view its details. If you click on the TP/SL price, you will see the prompt to update these - you can input the price desired for TP/SL and it will show you what % that would be in relation to your collateral. If you don't have a TP/SL set, it will show "None".
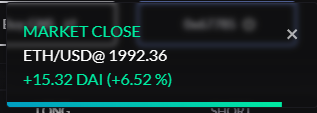
Closing a trade
Click on the X to the right-hand side of your trade in ‘Open Trades’.

Confirm in MetaMask to send the closure, in our case, to Polygon.
Await Trade Closure Confirmation. This is what you receive in your wallet.
Sources
Analyst Opinion
The gTrade platform is a user-friendly solution that simplifies the process of exploring and utilizing its various functionalities, even for those who are new to the platform. With low capital requirements, traders can conveniently trade US stocks without undergoing KYC or bureaucratic registration steps. The platform boasts an array of essential trading features, such as ‘One-Click Trading’, attractive leverages for cryptocurrencies, and a free practice mode. The platform's professional, modern, and intuitive interface provides an appealing option for traders who prioritize rapid and straightforward trade execution. Overall, gTrade offers a streamlined and efficient trading experience, making it an attractive option for traders who are seeking a user-friendly and hassle-free platform.
Peter Nemcok
.png)